Working With Security History
| Getting Started and Selecting a View | Searching and Examining Details | Quarantining Suspect Software | Restoring Quarantined Software | Submitting a File | Taking Other Actions With Alerts |
Taking Other Actions With Alerts
Depending on the alert, Security History displays various options in the Advanced Details window. For example, removing an item from Security History would become necessary when the item is no longer needed.
The following actions can be taken, depending on the alert.
| Action | Description |
| Restore Risk | Returns the selected item to its original location without repairing it. See Restoring Quarantined Software. |
| Remove From History | Removes the selected item from the Security History log. See Here's How. |
| Submit to Symantec | Sends the selected item to Symantec. You can use this option if you suspect that an item is infected, even if scans have not identified it as a risk. See Submitting a File. |
| Trust | Allows the selected computer or allows all of the unclassified computers on the selected network to access your computer. |
| Restrict | Blocks the selected computer or blocks all of the unclassified computers on the selected network from accessing your computer. |
| Remove trust | Removes the trusted status from the selected computer or from all of the unclassified computers on the selected network. |
| Remove restriction | Removes the restricted status from the selected computer or from all of the unclassified computers on the selected network. |
| Allow | Allows the selected program to access the Internet. |
| Stop notifying me | Prevents Norton Security Online from notifying you when it blocks the selected attack signature in the future. |
| Notify me | Allows Norton Security Online to notify you when it blocks the selected attack signature in the future. |
(More Details)
Here's How
-
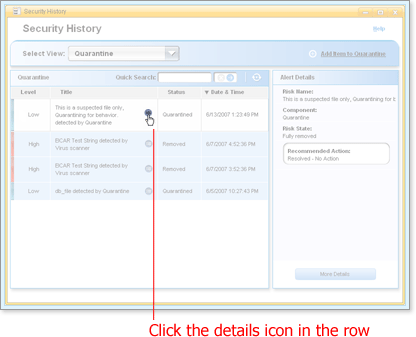
Open Security History and click the current view name. (Remind me how.)
-
Choose Quarantine from near the end of the list that opens.
Security History refreshes with a list of quarantined items.
-
Find the item in the list and open the Advanced Details window by clicking
 in the Title column.
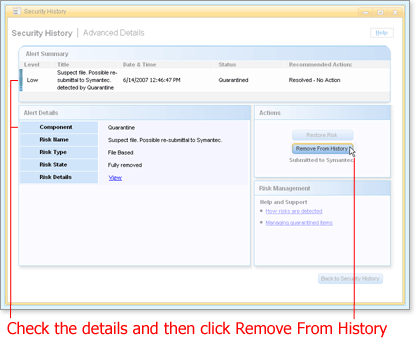
The Advanced Details window opens for the item you chose.
-
Check the details to make sure this item is the one you want to remove, and then click Remove From History.

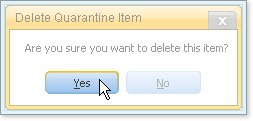
Delete Quarantine Item opens, asking you to confirm the removal or deletion.
-
Click Yes.

The list refreshes with the remaining items.
What's Next
Now that you've had a background in dealing with suspect files, make sure you are familiar with the standard and advanced protections available.
Words to Know
- Attack signature: a unique arrangement of information that can be used to identify an attacker's attempt to exploit a known operating system or application vulnerability.